Sunday, January 27, 2008

Craft Wall Organizer


Big Shout out to BichonMom over at thenest.com for the instructions on how to create this great PB knock-off! And, a HUGE Thank You for my husband for making this creation for me!

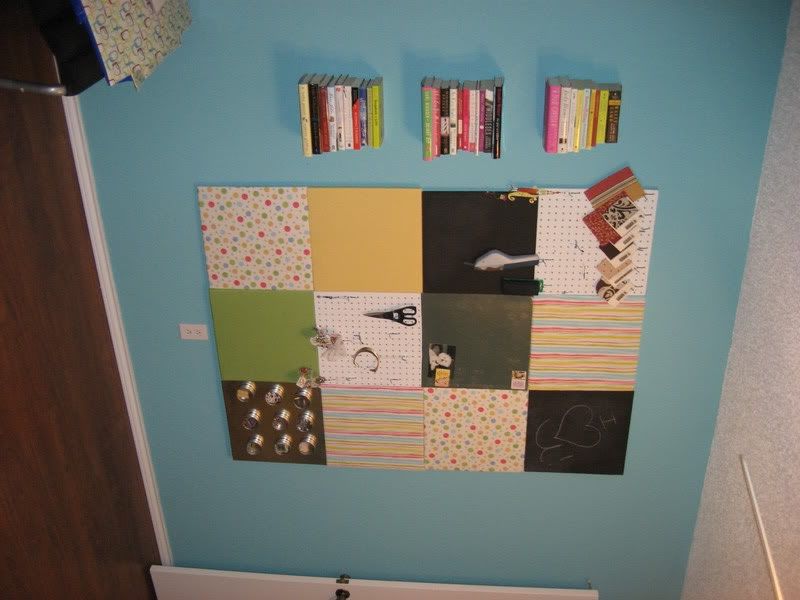
The 2 flat pink squares are magnetic and the 2 flat black squares are painted w/ chalk board paint. I can't wait to pick up some chalk and draw something cute! Then, I have batting and fabric covering 3 squares for my home-made push pins. I also have one cork square and one peg board square.

All that is left it to frame it out with some painted black wood. Hopefully we'll get to that before too long! Check out the pic's of the really cool bracket DH made for this, too.

Wednesday, January 23, 2008

Recipe - Stuffed Green Peppers - Non-Crockpot


I actually made them on Sunday. They are 93% lean ground beef, whole grain Success rice, and some organic tomato sauce made by my favorite Nature's Promise. These are so easy to make and healthy, too!
LOL, I posted this entry and then realized that I need a new pan!

Saturday, January 19, 2008

$6 Push Pin Substitutes


So, to accompany my FAB new cork board, I needed some push pins. I didn't want the boring old silver-style push-pins or thumb tacks. I wanted something cute and fun! I found these at Ballard design and liked them but couldn't part w/ the $: http://www.ballarddesigns.com/Gifts-under-35/Set-of-24-City-Push-Pins/p/112?RS=1&keyword=push+pins

I LOVED a bunch of home made push pins available on Etsy. But, I SO could not force myself to fork over $6 for 4 push pins. I decided to make my own. Like most of my craft projects, it required buying some new supplies. I got a bunch of cute plastic do-dads, some push pins and some thumb tacks from staples and some super glue. I also got some Martha Stewart brand wacky-tacky stuff. To make the clear push pins, I got a couple of packages of the clear 1/2 marbles from Michael's.

I started with the plastic do-dads. Some had loopy things on the back that we were able to break off with pliers. I used the super glue and affixed them. This process worked well! Watch out for the plastic do-dads that come with a sticker on the back. This style poses problems. Either your tack can't stay affixed or, the tack only covers a small portion of the sticker part and the rest of it picks up dust and junk.

I have had little success with the glass marble type of magnets b/c if I find some cute tiny stickers or what not, I can glue or affix them to the pins easily. But, when it comes time to affix the pin to the marble I have issues. If I use super glue it leaves a white ring residue around the picture. Not cool. Then, if i use wacky tacky it takes forever to dry. Any suggestions?

Either way they were fun to make!

Soup's On:


In our on-going effort to lose weight and eat better I decided to make some home-made chicken and veggie soup. I started with Nature's Promise organic Veggie Broth. I added 2 onions, celery, carrots and cabbage (1/2 head). I started it boiling and went to get the chicken ready. The chicken was still hard as a rock, so, I decided to use Canadian Bacon instead (low fat). It smells delish (please no Rachel Ray comparison's... I have never seen her DD commercial nor her show). I realized that I needed some more broth so I added 1 can of Dora the Explorer chicken noodle soup and 1 can of water. Look out Dora!

I decided to use potatoes as the starch in this creation. I added them last so they wouldn't get too mushy. I need to buy a decent Thermos so I can take some soup stuff to work (our microwave situation is a PITA to say the least).

Sunday, January 13, 2008

What are you currently reading?

I need a suggestion for my next book.

I'm currently reading The Lumby Lines by Gail Fraser.
My college friend who now resides in CA recommended it. She also mailed it out to me, so how could I resist? Apparently it is the first in a series. I have about 30-40 pages left and I'll post a review.

DIY Valentine's Day Decorations


I needed a couple more Valentine's Decorations. I'm especially proud of the red glitter stipped heart!

Count Down to St. Patty's Day:


My favorite Holiday is St. Patty's Day.
I love going out to celebrate more than anything. The only problem is my job! It keeps me too busy and doesn't allow me to go out and celebrate due to the fact that the 17th of March is right before a big deadline :-(

So, instead I have decided to start decorating the house to cheer me up!
My holiday decoration budget is quite small. I bought a 6 pack of shamrocks from Michael's Craft Store. To make them even move fabulous, you guessed it, I glitterized them! So far I have only one the green ones. I have to pick up some yellow glitter and get busy!!

Craft Assistants Needed- ASAP


LOL, I need some craft assistants!
Position Requirements:
-Must be cute & furry
-Must be willing to keep master crafter company
-Must be available 24/7
-Must not talk back

Fix it Day


Today I desperately had to devote some time to fixing stuff. I have one of those wooden collectible angel thingies that accidentally got decapitated. WHOOPS. And, one of my favorite Scooby Doo ornaments needed some serious TLC.

Luckily with the help of my hot glue gun, I was able to fix them both up!!
Scooby has been packed away for another year while the Willow Tree Figure is now in my craft room.

Don't say goodbye to Jingle Bells just yet:


So, I found these great LARGE jingle bell ornaments at Joann Fabrics for 75% off. Woo-Hoo. They come 3 to a pack, 2 red and 1 green. I decided to glitter-ize 2 of then and leave one red & shiny. Next x-mas I will probably attach some ribbon and hang them in the bay window or something.
These were so easy to Jazz up! I again used my Martha glittering glue and her red & green glitters.


Saturday, January 5, 2008

Where do I craft?


When we moved into the house, hubster helped me setup some craft space in the basement. It was nice b/c everything was organized and had a place. But, I never actually wanted to sit in the basement and do my crafts down there. So, I would pack stuff up, bring it upstairs, set it up and then have to pack it up again and bring it back downstairs. Yawn.

I've been dying for some craft space! I just needed the motivation to declutter the guest room and make space. Plus, I need an actual work area/desk.

I have been eyeing the PB Craft Table. It's wonderful. But, it's $1200. I also love it in black. But I like the look of the white, too; especially for a craft table. On X-mas someone was kind enough to notify me that the knock-off at Pier1 (reg $450) was going to be clearanced to $298. I was going to buy the side 3x3 cubes from Target and a piece of wood from Home Depot. Then, we could put a wood border about the top piece of wood to frame it out and have it look nice. But, that would have cost about $150 or so + paint. I was ok paying the $298. The day after Christmas I got up early and hit Pier 1. The desk was at my local store setup in black. I bought it. But decided I may actually want the white. So, I packed it up and went to another Pier 1 a couple of towns away. A gf was actually able to meet me here. They had the desk setup in both the white and the black. After much ado, I decided I did want the black. DH helped me set it up and now I'm in business! We have a guest room that is now a guest room/craft room. I'm dying to make this wicked cool (I'm from MA, lol, this means GREAT) wall organizer thingie. Credit goes to BichonMom from the nest.com. I love her bio!

http://i61.photobucket.com/albums/h49/QueenBrianne/IMG_0383.jpg

I'll post some more pic's as soon as I get the wall organizer made.

I'm late to the glitter phase but it's now my friend:


Hello all,
I'm a but late to the glitter phase (I missed the glitter pumpkins and gourds) but I am loving it! I scored an apothecary jar at Kohl's for $8 (originally $40, but seriously does anyone ever pay full price for anything at Kohl's with their FAB sales and coupons?). My jar came with some pine cones and some leaves. Too boring for me so I decided to pass on the leaves and glitter-ize the pine cones. Surly I'm not the first to attempt this. But, it was my first attempt.

I bought Martha's Glittering Glue. While I now think I paid almost $4 for a small bottle of Elmer's glue, I do have to say it was worth it for the brush applicator that comes w/ this bottle. I will probably refill with Elmer's in the future.

I also bought Martha's glitter. It's not quite ultra fine but it is pretty close. My silver ultra fine glitter came in a small container at Michael's. This stuff is nice and inexpensive. But, I love the jars that the Martha glitter comes in. They have a top on them similar to shaker cheese containers. You can have a LOT or just a sprinkle coming out.

I did all pine cones in a silver glitter except for one which I did in red. I didn't want my display to look too Christmas-ey byt I was dying to break into the red.